8 Steps to Prepare Data for Teamcenter Classification
It’s never too late (or early) to begin preparing your data for Product Lifecycle Management (PLM) integration. In fact, the earlier the better!
“But there are so many PLM systems to choose from. How do I know which is best for my company?” We understand this can be an overwhelming decision—but if you ask our team of technical data experts, many of our customers see success with Teamcenter by Siemens.
Teamcenter is one of the most widely used PLM softwares. With guided tours of common PLM use cases, Teamcenter makes it simple to normalize and classify data. The modern, user-friendly Teamcenter interface allows people across your organization to play a role in the product development process more easily than ever before.
Below we walk through a high-level demo of the platform and offer insight on Convergence Data’s eight-step process to preparing your data for Teamcenter classification. Want to see the inner workings of Teamcenter for yourself? Check out this on-demand demo we offered during a recent webinar.
Navigating Teamcenter
Teamcenter has an extremely user-friendly interface. When you first open the platform, you will be brought to an online client center [image A] where you will navigate to the classification tile.
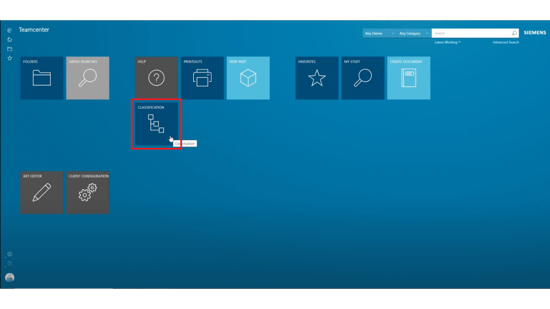 Image A
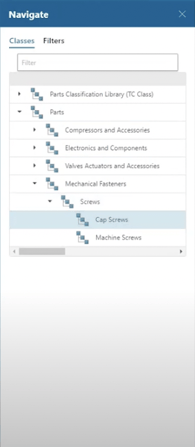
Once the classification center opens, you will have the ability to filter through categories [image B] such as compressors and accessories and/or electronics and components to find the exact parts you are looking for.
After finding and clicking into the correct parts (e.g. cap screws), you are able to edit the attribute values (i.e. black oxide) and toggle the metrics to change to the viewing method you prefer [image C].
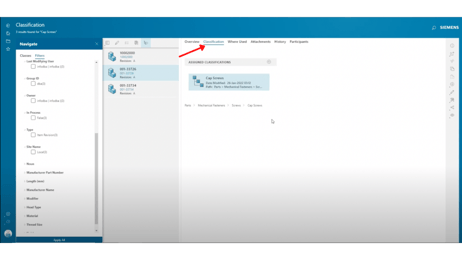
Image C Image B
Not only can you edit individual attributes, you are also able to compare your items using Teamcenter’s comparison tool [image D]. You can click on different parts and see how they compare to one another or its competitors.
If you are having a difficult time finding the exact part you are looking for, Teamcenter’s classification center allows you to search for specific terms. So, rather than showing all the parts that fall under one category, the search function will show you every single part that exists within the system that includes the term you searched for [image E].
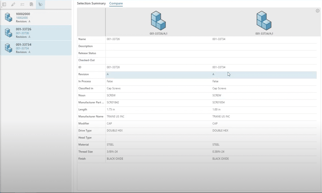
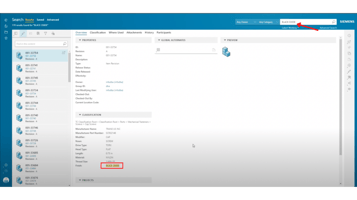
Image D Image E
Our Eight-Step Process for Data Migration
Step 1: Load All Legacy Data
To begin your PLM integration, you’re going to need data—that’s where our first step in the process comes into play. If not done already, you will load all legacy data into Teamcenter.
The legacy data used includes:
- Item number.
- Item name.
- Manufacturer name.
- Manufacturer number.
Importing dirty data and duplicate parts is the fastest way to cheapen your PLM investment. If you’re just starting out or in the process of migrating your data into Teamcenter, make sure you are only importing clean data into the system.
Step 2: Build the Data Model
Next, create categories ranging from the very high-level parent category (e.g. parts), all the way down to the leaf node (e.g. cap screws). It’s important to apply attributes to each category as well—this makes for easier findability.
One way to easily test your data model is using our proprietary Design for Retrieval (DFR) software. The image featured below [image F] is what our DFR software staging environment looks like. On the left, you’ll see a hierarchy—you’ll notice we have it organized from parts, down to mechanical fasteners, even further to subclass screws and finally leaf node screws. The more granular you can get, the better.
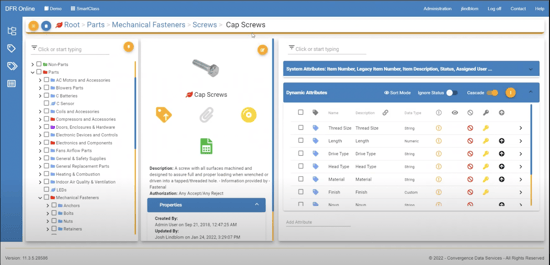
Image F
On the right are different attributes that are tied to the classification. The following attributes help make the data modeling process easier and more organized:
- Different data types.
- Required field toggle (Image G).
- Allowed values.
- LOV lists.
Step 3: Data Harvesting
When it comes to the third step, data can be enriched based on a manufacturer spreadsheet or PDF drawing. It’s up to you to determine how you want data to be harvested and enriched.
Step 4: Normalizing Data
Data is typically normalized for any string attribute. To do so, create an allowed values list or an LOV pick list for the user to drop down to select whichever item attribute.
If utilizing Convergence Data’s DFR software, the DFR admin can define what are the approved, allowed values—meaning what the user will be able to select and filter upon [image G].
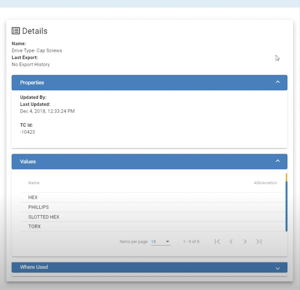
Image G
Step 5: Data Validation
We have another module in our DFR software that identifies any potential data entry errors in the system. This is a pre-scrubbing function used to highlight enriched data that will not sync with the data migration.
The pink cells below [image H] emphasize any item attribute data that are being flagged for validation errors within Teamcenter. Some examples specific to Teamcenter include:
- Strings in numeric fields.
- Nulls for required attributes.
- LOVs.
- Field lengths.
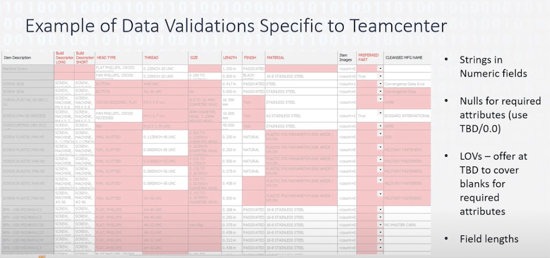
Image H
DFR works well with Teamcenter in setting these rules up to align with the system’s import restrictions. For example, LOVs can’t have a length of over 63 characters—this is something that can be set up in DFR to avoid import issues.
Additionally, when it comes to Teamcenter, you have the ability to toggle nulls for required (mandatory) attributes. That said, you can choose to configure your Teamcenter environment to allow nulls in mandatory attribute fields or to restrict them—so if an item has a null and/or a mandatory field, it will not load.
Step 6: Policy Manager
This is where you can define the attribute length for categories as well as any special characters. Knowing the target PLM (i.e. Teamcenter), you’ll determine those unique rules and apply them to the policy manager. You can then run validations and correct any categories, attributes or special characters if needed.
Step 7: Exports
When it comes to exports, Teamcenter has four different types:
- Attributes
- LOVs
- Classification
- Items
In step seven, you must supply both the attribute LOV and classification export in an XML as well as an item export. Keep in mind that Teamcenter requires loading in a specific order—LOVs, attributes, classification and then items.
Our DFR software exports all four of these items from the PLM system into an XML format, making it Teamcenter ready.
Step 8: Teamcenter Integration
Once everything is complete, just import the XML files into Teamcenter. This is where your data model, attributes and categories will be housed.
Talk With a Data Expert About Your Teamcenter Migration
To have a successful data migration to Teamcenter, do the necessary up-front work of data cleansing, validating, and classifying.
Companies with unorganized or incomplete data trust Convergence Data to scrub that information into a user-friendly, efficient structure. Want to talk more about Teamcenter? Visit us at booth 309 at Siemens’ Realize LIVE conference May 9 - 12 in Las Vegas.


